 |
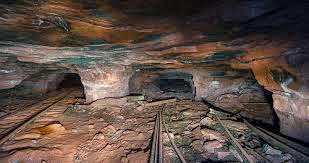
| Abandoned iron mine pic I stole off of Google Images. |
Today I jumped around between 3 different projects relating to the iron mine scenery I'm working on. The afternoon began with some quick shaping of the other half of the chasm I was working on in Making Mine Scenery Part II. Since I already discuss the shaping process in detail, I'll just show you two quick shots, one of the pieces after shaping and then another of pieces being left to glue. Pretty dramatic stuff (actually its really not). Thanks to Edgar Allen Poe for the assist.
 |
| More shaped pink foam waiting for glue. |
 |
| Luckily for my project Edgar Allan Poe was a prolific writer. I'm not sure where my bricks are. Which begs the question.. "How do you lose a brick?" |
So with the chasm section left to dry it was time to work on something else, so I dragged out the three original board sections from Making Mine Scenery Part I for some rough detailing. In the photo I started the article with you'll notice that an iron mine has a lot of color. Dirt, iron ore, and oxidation result in colors including brown, grey, metallic, and orange. As you can see in this photo I left off with having a Scorched Brown basecoat, Bubonic Brown drybrush, Bleached Bone drybrush (all old school Citadel colors), and then a targeted Graphite drybrush (Americana craft paint).
 |
| This piece looked pretty swank as is right? But not "iron mine" enough in my book, so more color must be added. |
With these back on the table, I put them through three more stages today. First I did another targeted drybrush of Boltgun Metal.
 |
| Looking a little silvery grey. Its getting there. |
I followed this with Chainmail because it wasn't dramatic enough.
 |
| Now its where it should be. |
With the Graphite now having visible flecks of metallic shimmer, I moved onto the next stage.
 |
| Solar Macharius Orange definitely gave it more of the look, but I might still hit it with more orange when we get to the end. |
Solar Macharius Orange was then stippled onto the ground and walls to add oxidation. Feeling like I had made solid progress on the original board sections, I grabbed this much more detailed piece.
 |
| Foamcore, pink foam, Plastruct I-beams, some cardstock used for picture framing that has a light texture to it, and some trimmed plastic bits. Yeah, I guess it could be a blog post on its own. |
This piece has been hiding in the background of some of the pictures already posted. It's based on a section of the board that will come with the Broken Contract book and depicts a really unstable section of the mines where iron workers started to put up a retaining wall and supports, and then were reassigned somewhere else with the job left unfinished. The gubbins on the wall is an emergency door controller and alarm (complete with a tiny light on top, stolen from a Cities of Death building.) All I did with this piece was to basecoat by hand all the white areas with Chaos Black. No pic needed.
 |
| The board section for "It's Time", the sample scenario in the rule book. Graphic design by Samuel Alcarez. |
Here's a shot of the game board section. The above piece represents the lower right hand quadrant of the board,
That's it for today. The sun is setting and paint and glue are drying and I have to do another pass through the current version of the Alpha Rules. Yesterday Sam Alcarez, our graphic designer, sent me 8 sample pages from the WIP rulebook and the background and boarder looks great, but he's working off of an old version of the rule book so its time to get him something up to date. That will be tonight's project.
 |
| Rule book WIP sample page from Samuel Alcarez. We're getting there! |
-Nick

Comments
Post a Comment